What is an ellipse? It's how artists represent a circle in perspective, and it is…
Quick & Simple Cone Rendering in Illustrator
The basic cone in Illustrator introduces some exciting challenges, because a cone has a more complex shadow than a simple gradient. Understanding how to make this complex gradient will allow you to create much more subtle shading in more complex objects.
The result of this tutorial will be a matte (not reflective) cone. The difference between this and a more complex object would be the amount of time spend adding and refining details such as reflected light or cast shadows (which we won’t cover here), as well as adding additional layers and stylizations for color, reflections, etc.
Necessary tools/skills to complete this tutorial
- A solid understanding of ellipses in perspective
- Ellipse Tool (L) – creates ellipses
- Shift+Drag – pulls out a circle
- Opt+Drag (Mac) or Al+Drag (Win) – pulls ellipse out from center
- Combine the two to pull a perfect circle from the center
- Shape transformation keyboard shortcuts
- Shift+Drag – resizes while maintaining proportions
- Opt+Drag (Mac) or Al+Drag (Win) – resizes proportionally around center
- Combine the two – resizes all proportions from center
- Duplicate Object in Place – Copy (Cntrl/Cmd + C) then Paste in Place (Shift + Control/Cmd + V)
- Blend (Object > Blend > Make) – make a smooth gradient between two objects
- (optional) Gradient Mesh Tool (U) – makes a smooth gradient by defining colors at multiple points
Now let’s get started!
- Sketch a cone in perspective, following the rules of 1, 2 or 3 pt. Place your sketch in your Illustrator document. If you wish to see your sketch throughout the process, place it as the top layer and set the Layer Blend Mode to “Multiply.” Lock your layer so you don’t accidentally move it. This will make it so only the dark parts of the sketch show up. You can view or hide this throughout the process.
- Double-check that your document is in RGB mode (the gradient may not work properly otherwise).
- Make three new layers and drag them below the sketch layer.
- Name one “In Progress.” This is where you will render your form.
- Name one “Completed.” This is where you will place finished forms while you practice more.
- Name the bottom layer “Background” and add a simple rectangle as a background (see layer order in image below).

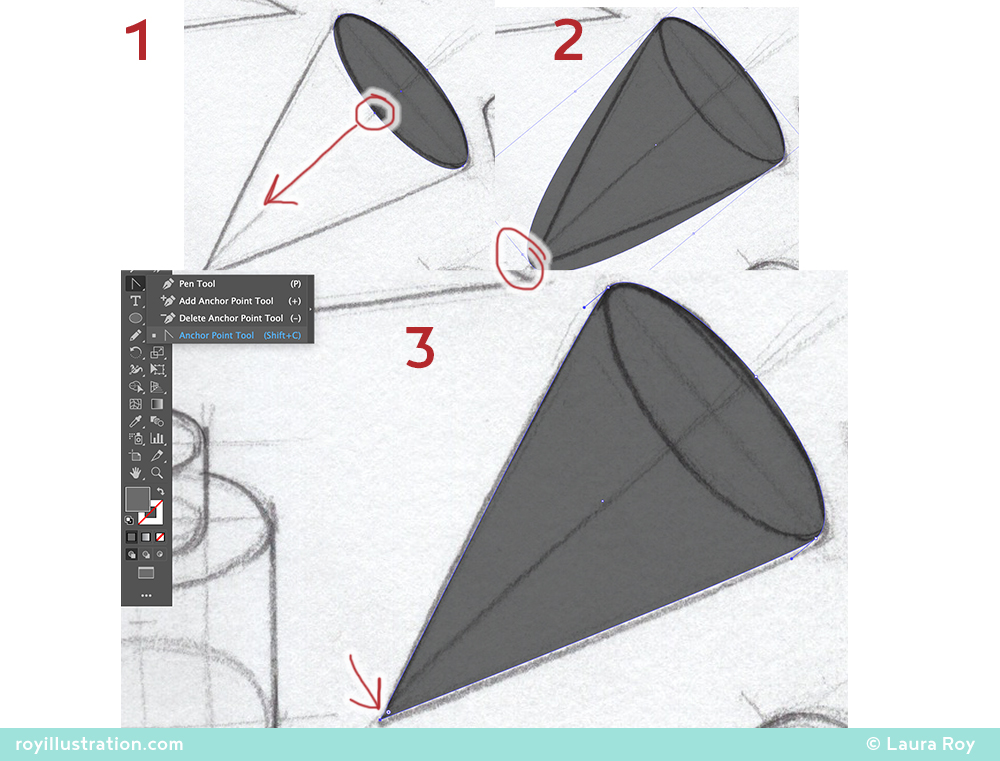
- Create the cone’s base with an ellipse or the pen tool.
The pen tool can work, but you can also start with an ellipse (which works in most cases unless you area viewing the cone from extreme perspective).
–Use L / ellipse tool to create an ellipse, then use the black to adjust it. V will get you the black arrow (can move whole paths) You may need to rotate or resize your ellipse to match the necessary perspective (use keyboard shortcuts above to transform as needed). - If the cap is visible in the drawing, make a duplicate of the ellipse (Copy (Cntrl/Cmd + C) then Paste in Place (Shift + Control/Cmd + V))
You’ll use this to make the cone’s “point.” - Extend the new ellipse to make the point of the cone.
- Activate the White Arrow (A). Select the anchor point nearest the tip of the cone.
- Drag it out to the tip.
- Make a hard edge: Activate the Anchor Point Tool (Shift+C) and click on the point to convert it from a smooth to a corner point.
- Create a blend to make the correct gradient along the “point” using the following technique (see figures below):
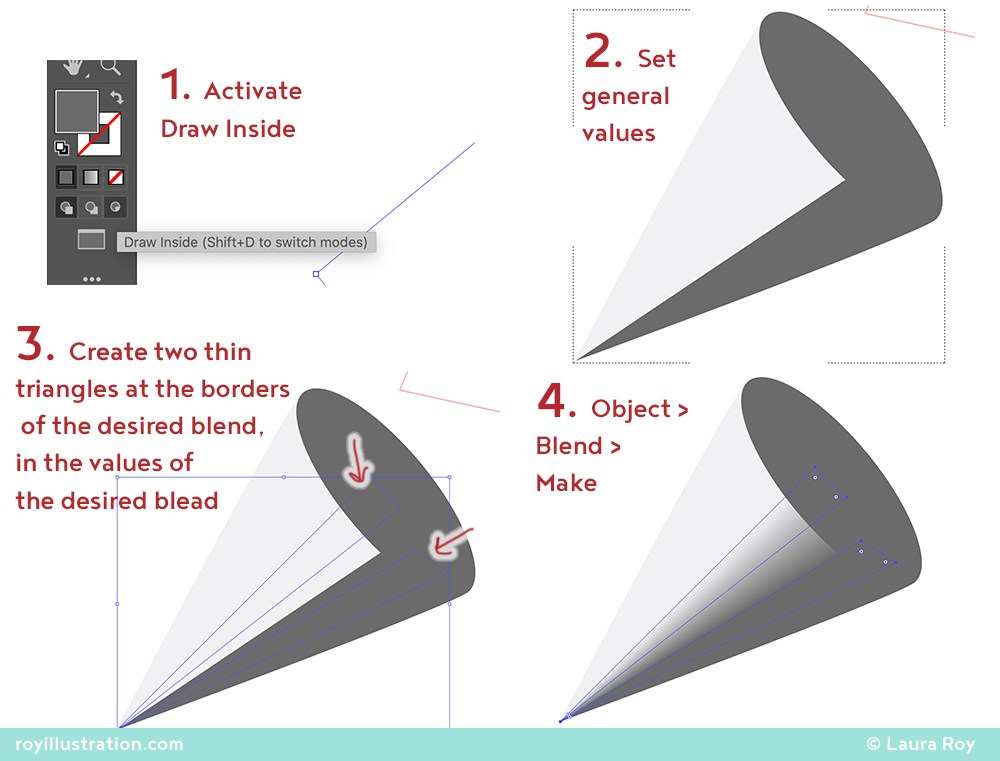
NOTE: the Gradient Tool doesn’t work here, because the cone’s gradient changes width as it extends along the cone. To deal with this, we will create an object blend.- Prepare the shape by activating “Draw Inside” Mode on the cone’s “point.”
- Create the tones your blend will sit on top of as follows
- Set the fill of the point shape to the desired light value.
- Use the pen tool to create a shape covering the shadow area with the appropriate value (the hard edge is okay… you will place the blend on top of this).
- Prepare your blend:
- Create two more thin triangle shapes of the same value over the area you want to blend (i.e., where the light shifts to shadow). One triangle will be the same as your light value and be on the light side. The other will be the same as your shadow value and be on the dark side.
- Select the two new triangles with the black arrow (V). Hold shift to select both at once.
- Navigate in the menu to Object > Blend > Make. If it doesn’t look right, open the Blend Options (Same location) and be sure it is set to “Smooth Color”. If you still have issues, try the alternate gradient mesh at the end of this tutorial.
- Adjust the color of the cap if desired (it should be the same value or lighter than your form shadow).
- Finish Up
- Group your objects (Control/Cmd+G) and rename your group to something meaningful.
- Hide the sketch layer
- When you are satisfied and want to try another, move your work into the “Completed” layer. LOCK the layer.
- Save your work!
And there you go: a simple matte cone! To take this further, you could add a little reflected light and a cast shadow. Color and more will be discussed in future tutorials.
KEY TAKEAWAYS: Use object blends to create complex gradients. For other effects, experiment with the various choices in the Blend Options menu as well as using more than two objects to create a blend.
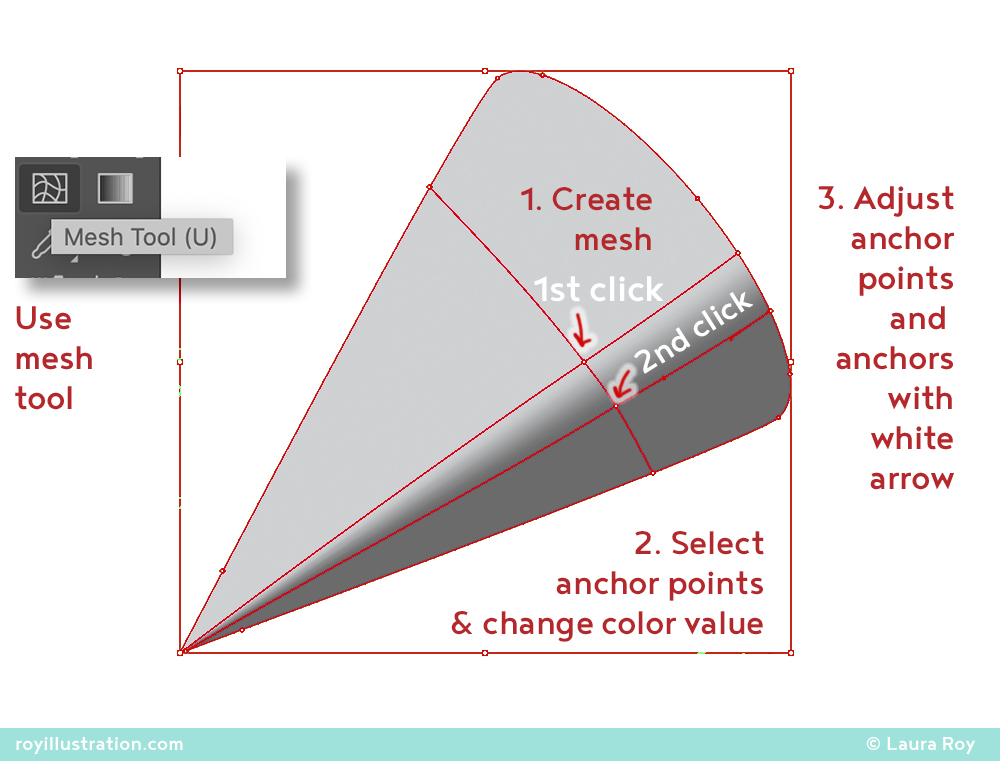
Alternate method : Gradient Mesh
If you are having trouble with the object blend, you can try using the Gradient Mesh tool. Omit step 6 from above, and do as follows to create the gradient:
- Create a blend to make the correct gradient along the “point” using the following technique (see figures below):
- Prepare & Activate Mesh
- Hide the cone’s base ellipse, if applicable, and select the cone’s “point.”
- Set the shape’s fill to the desired value for the light side of the object.
- Make a duplicate of the shape in case your gradient mesh doesn’t work the way you want on the first attempt.
- Activate the Gradient Mesh tool (U).
- Create the mesh: click within the cone at the edge of any point where you want the gradient to start turning to shadow. Click again where you want the gradient to end.
- Color the mesh: Using the white arrow (A), and holding shift, click to select all anchor points you want to reside in the shadow side of the form. Then choose their new value from the color panel. If you missed one, you can select its and use the Eyedropper tool (I) to copy the color value from another anchor.
- Adjust the mesh: Use the white arrow (A) to adjust any anchors in order to get an accurate form shadow. The mesh should ideally wrap with the form as closely as possible.
TIP: If you can’t get the mesh to work without obscuring the outline of the shape, try making a clipping group (Draw Inside) with the original shape then placing a slightly larger gradient mesh shape inside the group. This technique can be used to cut hide many weird gradient mesh artifacts.
- Prepare & Activate Mesh
Did you find this helpful? Do you have any of your own tips you’d like to share? I’d love to hear about it if you decide to try something new. If you use it differently, I’d love to hear that, too!

– Laura
Related Posts