What is an ellipse? It's how artists represent a circle in perspective, and it is…

Quick & Simple Cube Rendering in Illustrator
Why would you care to know how to render a basic cube in Illustrator? Because the steps involved are a simplification of the steps you can take to render anything more complex. Master these basic concepts, and you’ve mastered the first step to rendering anything in Illustrator.
The result of this tutorial will be a matte (not reflective) cube. The difference between this cube and a more complex object would be the amount of time spend adding and refining details such as reflected light or cast shadows (which we won’t cover here), as well as adding additional layers and stylizations for color, reflections, etc.
But first things first; we have to start the journey with establishing accurate drawing and value relationships.
- Sketch a cube in perspective, following the rules of 1, 2 or 3 pt. Place your sketch in your Illustrator document. If you wish to see your sketch throughout the process, place it as the top layer and set the Layer Blend Mode to “Multiply.” Lock your layer so you don’t accidentally move it.
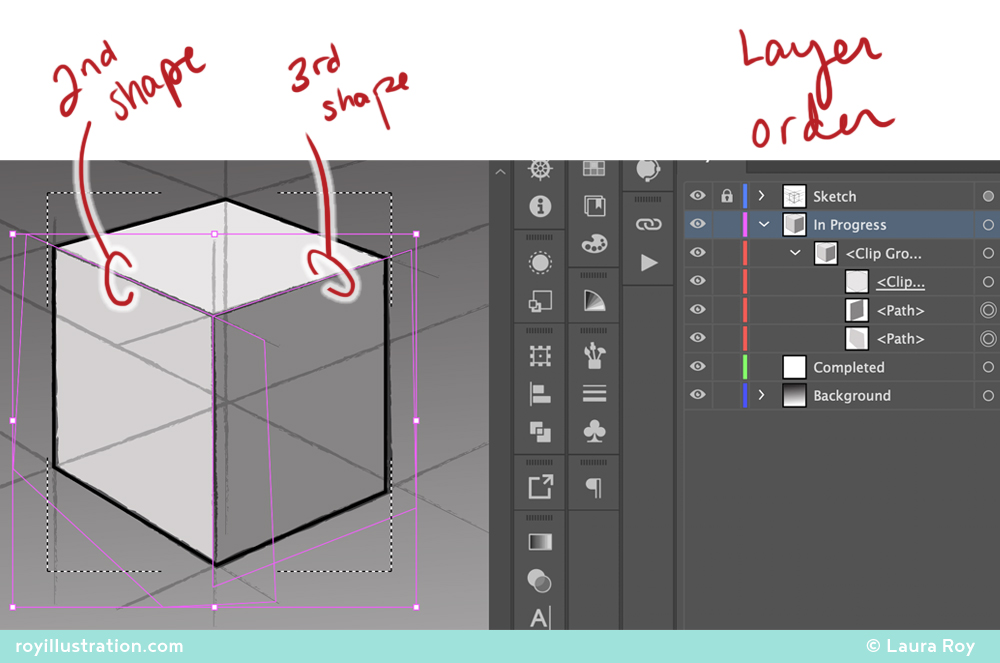
- Make three new layers and drag them below the sketch layer.
- Name one “In Progress.” This is where you will render your cube.
- Name one “Completed.” This is where you will place finished cubes while you practice more.
- Name the bottom layer “Background” and add a simple rectangle as a background (see layer order in image below).

- Create a path that fits the outline of your cube.
Use P / pen tool to create your path, and the arrows to adjust them: V will get you the black arrow (can move whole paths), and A will get you the white arrow (moves individual points). Use the white arrow to adjust the anchor points of your paths to improve your drawing if you see errors in the original sketch. Hold down shift as you are creating vertical or horizontal lines to maintain perfect alignment. - Set the color on your selected shape.
- Fill: Open the Color window, set to HSB (Hue/Saturation/Black) (use hamburger lines in top right if HSB isn’t the default view). Drag H & S to 0 and choose a light grey Black value
- Stroke: Set to NONE (the box with the red hash line).

- Activate “Draw Inside” mode (located on the bottom of the Toolbar at left). This creates a Clipping Group, so everything you create in this mode will only be visible within the confines of your initial shape. To exit this mode, press the “Draw Normal” button in the same location.
FYI: You will still be able to access all of your new individual shapes as components of a group in your layers panel after leaving Draw Inside mode. - Create your 2nd and 3rd sides as follows (see image below):
- Side 2: Create a shape and keep one “clean” hard edge, but overlap onto the background and side with your additional edges. Adjust the value of the grey as needed
- Side 3: Create the final side by making keeping two clean hard edges within the cube, but allowing the other points to overlap the background. Adjust the value of the grey as needed.
- Finish Up
- Rename your clip group to something meaningful.
- Hide the sketch layer
- When you are satisfied and want to try another, move your work into the “Completed” layer. LOCK the layer.
- Save your work!
There you have it! A simple matte cube. To take this further, you could add a little reflected light and a cast shadow. Color and more will be discussed in future tutorials.
KEY TAKEAWAYS: Use overlapping paths to refine your drawing and create a clean base layer. Use clipping groups (“Draw Inside”) to contain your shape and cleanly add value variation within an object.
Did you find this helpful? Do you have any of your own tips you’d like to share? I’d love to hear about it if you decide to try something new. If you use it differently, I’d love to hear that, too!

– Laura
Related Posts